 Save
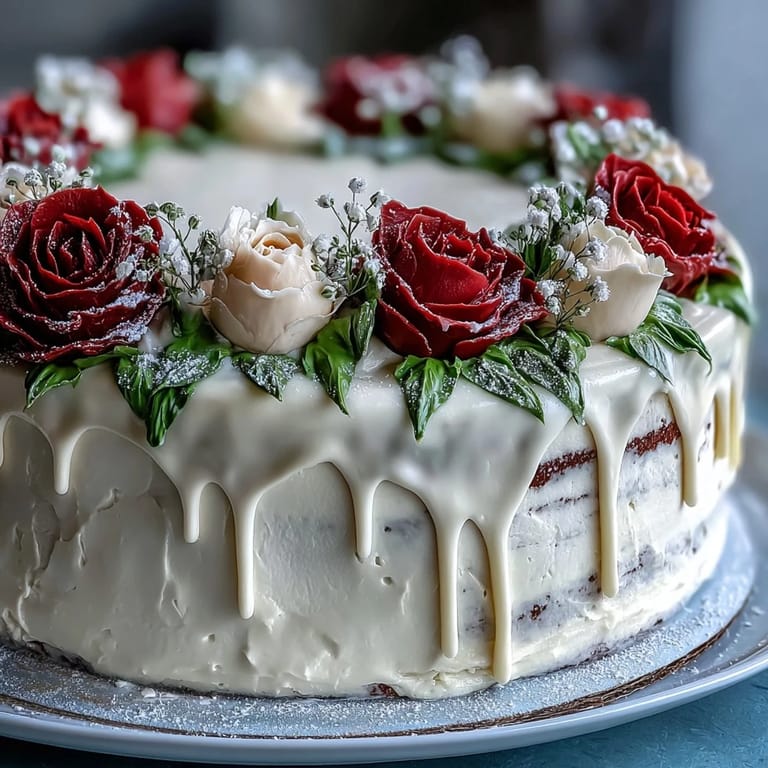
Save My friend texted me a photo of her cap and gown at 6 AM, and suddenly I was scrambling to plan something worthy of the moment. A sheet cake felt right—big enough to share, elegant enough to photograph, and personal enough to mean something. I'd never piped roses before, but watching YouTube videos at midnight while butter softened on the counter felt like the most important baking lesson I'd ever need. There's something about making a cake that celebrates someone that makes you want to get every detail just right.
The moment I carried this cake into her backyard party, her mom grabbed my arm and actually teared up—not because the roses were perfect, but because someone had shown up with something handmade. That's when I realized this isn't just a recipe; it's a love language disguised as frosting and flour.
Ingredients
- All-purpose flour (3 cups): This is your foundation, and measuring by weight matters more here than you'd think—too much and your cake becomes dense, too little and it won't hold together.
- Baking powder and baking soda (2 ½ tsp and ½ tsp): They work as your lift, and mixing them together prevents any metallic aftertaste from baking soda overpowering the vanilla.
- Salt (½ tsp): A tiny pinch that makes everything taste more like itself—don't skip it even though it seems invisible.
- Unsalted butter (1 cup for cake, 1 ½ cups for frosting): Room temperature is non-negotiable; cold butter won't cream properly and you'll miss that light, fluffy texture that makes this cake special.
- Granulated sugar (2 cups): The enemy of underbeating—spend the full 3-4 minutes creaming it with butter until it looks almost pale and sandy.
- Eggs (4 large): Room temperature eggs blend seamlessly; cold ones make the batter look curdled and scared, though it usually turns out fine anyway.
- Vanilla extract (1 tbsp for cake, 2 tsp for frosting): Use real vanilla if you can—the difference isn't subtle, and this is too important a cake for the imitation stuff.
- Whole milk (1 ¼ cups for cake, ¼ cup for frosting): Room temperature here too, so it doesn't shock the batter and cause separation.
- Powdered sugar (6 cups, sifted): Sift it before measuring, because lumps in your frosting turn into tiny frustrations when you're piping.
- Gel food coloring (assorted): Gel beats liquid every time—it won't thin your frosting and the colors stay vibrant without looking watered down.
Tired of Takeout? 🥡
Get 10 meals you can make faster than delivery arrives. Seriously.
One email. No spam. Unsubscribe anytime.
Instructions
- Set the stage:
- Preheat your oven to 350°F and grease that 12x18-inch pan like your life depends on it, then line it with parchment paper. The parchment is your safety net—it means the cake releases easily and you can actually frost the whole thing without it crumbling.
- Mix the dry team:
- Whisk flour, baking powder, baking soda, and salt together in a medium bowl until they're evenly distributed. This prevents any pocket of baking soda that'll taste bitter when you bite into your cake.
- Cream butter and sugar:
- Beat room-temperature butter and sugar together for 3-4 minutes until it looks pale, fluffy, and almost mousse-like. You're not rushing here—this step is where the cake gets its tender crumb, so don't skimp on time.
- Add eggs gently:
- Drop in one egg at a time, beating well after each one, then mix in the vanilla. If the batter looks separated and curdled, don't panic—it'll come together in the next step.
- Alternate wet and dry:
- Start with a third of the flour mixture, then half the milk, then another third of flour, then the rest of the milk, then the final flour. Mix just until combined—overmixing makes the cake tough and defeats everything you've worked for.
- Bake with patience:
- Pour the batter into your prepared pan, smooth the top, and slide it into the oven for 30-35 minutes. You'll know it's done when a toothpick comes out clean and the cake smells sweet and vanilla-y, not raw.
- Cool completely:
- Let the cake sit in the pan on a wire rack until it's truly cool—this matters because frosting warm cake is a disaster of melting sadness.
- Make the frosting:
- Beat butter until creamy and light, then gradually add sifted powdered sugar, milk, and vanilla, beating for about 5 minutes until it's smooth and fluffy. If it looks too soft, chill it for a bit; too stiff, add milk one teaspoon at a time.
- Color your dreams:
- Divide buttercream into bowls and tint each with gel food coloring, using more drops than you think you'll need for vibrant roses and leaves.
- A little goes a long way, but the colors deepen as you beat them in, so be patient.
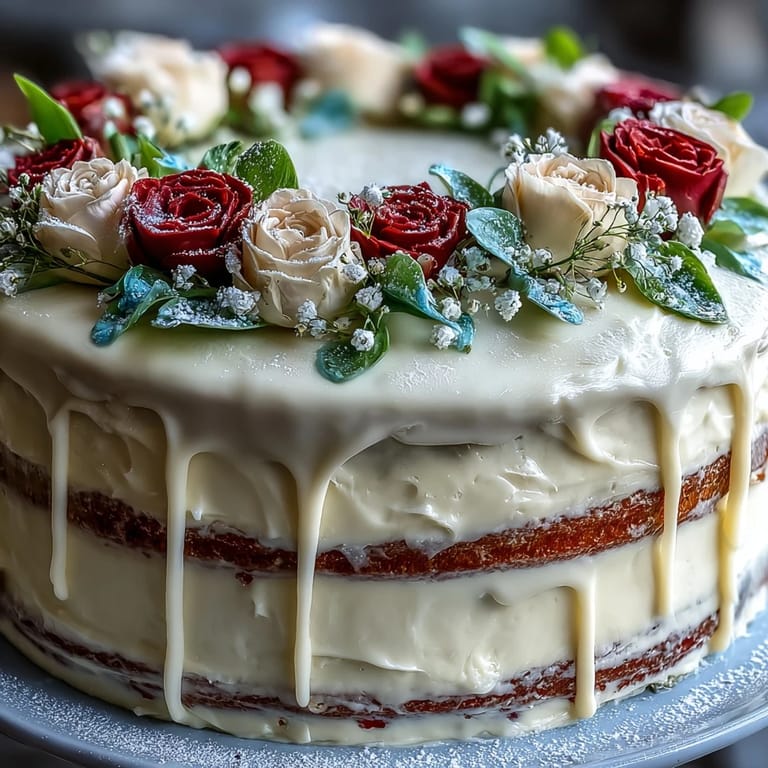
- Base layer:
- Spread a thin layer of white buttercream all over the cooled cake to create a smooth canvas for your roses. An offset spatula makes this easier, but the back of a spoon works too.
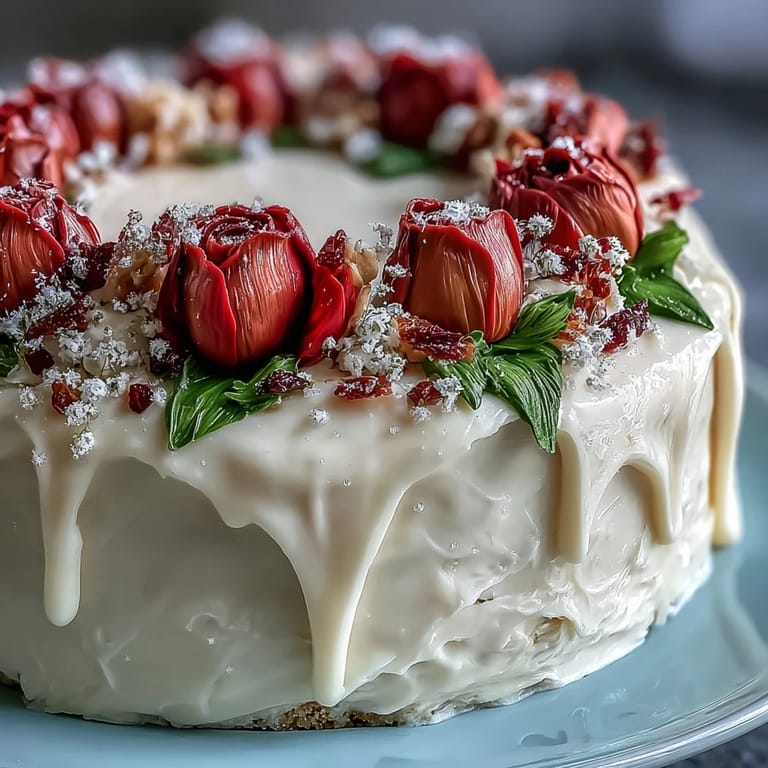
- Pipe your roses:
- Fit piping bags with petal tips, fill with colored frosting, and pipe roses by holding the bag at a 45-degree angle, applying gentle pressure in a spiral motion. They don't need to look perfect—imperfect roses look charming and real.
- Add green leaves:
- Switch to a leaf tip, pipe small leaves around your roses, and step back to admire how a sheet cake transformed into something that looks like it came from a fancy bakery.
- Write the message:
- Use a small round tip and white or coordinating frosting to write your congratulations message, keeping letters simple so they're readable and beautiful.
 Save
Save Later that week, she sent me a photo of the leftover cake in her fridge with a caption: 'Eating graduation cake for breakfast and calling it self-care.' It made me realize that the best recipes aren't just about feeding people—they're about creating moments worth remembering.
The Chocolate Variation That Secretly Works
If you want to swap vanilla for chocolate, replace ¾ cup of flour with ¾ cup unsweetened cocoa powder and reduce the sugar slightly to 1 ¾ cups. The chocolate version still takes roses beautifully, and somehow a chocolate cake with white roses looks even more dramatic. I've made this version for chocolate lovers who swear they'll never go back to vanilla, and they're probably right.
Timing and Storage Wisdom
You can bake the cake a full day or two before the celebration, wrap it well, and store it at room temperature—the crumb actually gets slightly moister overnight. The frosting can be made and colored the morning of, then piped whenever you find a quiet moment. Fully frosted cakes last up to 5 days in the refrigerator, though they're best eaten within 48 hours when the frosting is still at its peak softness and shine.
Making the Roses Look Effortless
The truth about buttercream roses is that they're forgiving in a way that feels like a secret. Even if your first few look wonky or lopsided, nobody but you will notice because they're all different sizes and positions. My trick is to pipe the roses onto a small square of parchment paper first, chill them for a few minutes, then carefully slide them onto the cake with a small offset spatula—this way you can arrange them perfectly without stressing about piping directly onto the frosting.
- Practice piping roses on parchment paper before committing to the actual cake, which takes the pressure off and makes the whole process feel like play instead of work.
- If a rose looks sad or flat, smooth it over with a spatula and pipe a leaf over the spot—leaves cover a multitude of frosting sins.
- Keep your piping bag warm by resting it on a warm (not hot) towel between batches, which keeps the frosting flowing smoothly.
 Save
Save This cake is celebration in a pan, the kind of dessert that proves you showed up and cared enough to try. Make it, frost it, write your message, and know that the imperfections are what make it real.
Recipe FAQ
- → What makes the cake moist and tender?
A combination of room temperature butter, eggs, milk, and careful mixing ensures a soft, moist crumb in this vanilla cake.
- → How is the buttercream prepared for decoration?
Butter is beaten until creamy before powdered sugar, milk, and vanilla are added. It's divided and tinted with gel food coloring for vibrant roses and leaves.
- → Can this cake be made in advance?
Yes, it can be covered at room temperature for up to 2 days or refrigerated for up to 5 days to maintain freshness.
- → What tools are needed for the piping decorations?
Essential tools include piping bags fitted with petal, leaf, and round tips, plus an offset spatula for smooth frosting application.
- → Is there a variation for chocolate lovers?
Yes, substituting ¾ cup flour with cocoa powder creates a chocolate version while maintaining texture and flavor balance.
- → What is the best way to store leftover portions?
Cover the leftovers and store at room temperature for short-term or refrigerate for longer freshness and quality preservation.